Windows Live offers a wealth of tools and services. Live Groups have some great features to help members stay in touch and to exchange photos and documents. Live Groups are a great way for families, teams, clubs, or any kind of group, to stay connected.
Each group has its own group email address, it takes the form groupname@groups.live.com. Normally any group member can send an email to the group address and it reaches all the members. Non-members cannot spam the group – their message to the group address does not go through.
Sharing of photos and documents is another nice feature. Each group has a group website with its own SkyDrive.
Setting up the group
 Setting up a Windows Live Group is very easy. Here is the procedure.
From your Windows Live Home page click Groups in the SkyDrive dropdown menu. See the illustration here.
Above the listing of your groups is a link “Create a group”. Click it to get started.
The screen clip here shows the “Create a group” page. The first step is to enter the name of the group. The second step is a bit harder, that is to select the group email address. Like any other email address, it has to be unique. It should be fairly short to make it easier for members to remember and to type. Like in setting up a regular email account there is a “Check availability” link. Once you have an acceptable name, you can finish by listing the initial members. You can add email addresses in the “Add people” field. There is also an option to add names from your contact list.
Click Create and your group will be set up and emails will go out to the people you listed in the “Add people” filed. You are now the “owner” of the group. The group now has a website. It can be found at groups.live.com/groupname.
There are a number of options to set features of the group.
You can upload a logo or group theme picture, or select one of the ones offered on the options page. There is a field for a group slogan and a short description.
You specify how new members can join. Either by invitation form you, the owner, or they can request to join on the group website. You can also specify if all members can add folders and albums or only the owners.
Members
 Here is what a typical membership invitation email looks like:
The invitee can click View group and will be taken to the group website where there is a “Join” button (also a “Decline Invitation” button). Note: The invitee must have a Windows Live ID and sign in to see the “Join” button.
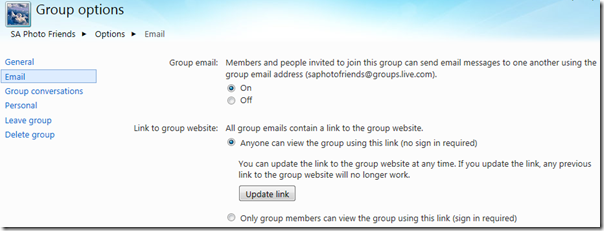
The way email is handled is subject to settings on the group option page for email.
See the illustration here. By default the option for all members to be able to send group emails is enabled.
There is another option there “Anyone can view the group …” with a link provided in each email. That is a useful feature as it provides a quick link to the group site. There is a downside: Anyone with that link can visit the group site. If your group site contains information – like member personal information, personal photos, etc. that should be more tightly protected, select the option that only signed-in group members can see the site.
There is much more to Live Groups. Sharing of photos is particularly important to many groups and that is the subject of my next post.
.:.
© 2011 Ludwig Keck
 |
 |
 |


