Windows 8 does not come with a desktop mail client installed. When you right-click on a photo and select Send to > Mail recipient, you get to an error message that tells you that “There is no email program associated to perform the requested action …” 
What to do? Install Windows Live Mail. This program is part of Windows Essentials and can be downloaded from download.live.com. Click Download now on that site. Then click Run in the download pane, then give your permission for the installation. When you get a choice, click “Choose the programs you want to install”. Make sure Mail is checked. Uncheck any you don’t want. The installation will proceed and a few minutes later will be ready to use.
Here is how to set up the mail client.
- Press the Windows key on the keyboard to get to the Start screen.
- In a space where there is no tile, right-click.
- There will be a bar at the bottom with just one link at the right end, the All Apps link. Click that.
 You will see a large array of app tiles and may have to scroll (to the right) to see them all.
- Find the tile for Windows Live Mail and click on it.
 You will be taken to your desktop and Windows Live Mail will open. Since you have not used it so far, it will walk you through the signup. If the sign-in dialog does not come up, click on Sign in in the upper right of the Mail window.
- Go ahead and sign in.
The Mail window will likely just sit there and stare at you. You are not done yet.
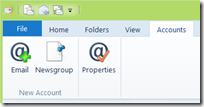
- Click the Accounts tab, then click the Email icon in the New Account section to add your account.
The “Add your email accounts” dialog will come up.
- Enter your email account. Enter your password and your name the way you want it to show on your emails.
If your account is also a hotmail.com or live.com or outlook.com address (or one of several others) you do not need to “Manually configure server settings”. If you are using another email service, you will need some technical information from your email provider to complete the setup (if you need help with that and can’t figure out how, you can Ask Ludwig).
- When you get to the “Your email account was added” dialog, click Finish.
Your emails will start coming in and your mail client is ready.
Now when you try to send a photo to an email recipient, Live Mail will come up. It just might try to send it as a “photo email”. There is much charm in that, but if you want to do it the old-fashioned way and send the photo as a attachment you can proceed as follows:
- Click on the thumbnail of the photo. This will select the “photo album” and you will see a Photo Album Tools tab.
- Click the Photo Album Tools tab.
- Click the paper clip icon. See the numbered arrows in the illustration to help you with these steps.
You photo is now going to be sent as an attachment, just the way you used to.
Finish your email normally and send it on its way.
.:.
© 2012 Ludwig Keck


